Classical Approaches
One of the best known techniques for oil painting uses a toned ground that shows through in the finished work. The advantages are:
1. Economy of effort: only paint in tones lighter or darker than the middle tone need be applied.
2. Thinner layers of paint, and hence a cheaper and more durable product.
3. Better control of tones, achieved through phasing the stages and correcting with final glazes.
The disadvantages are:
1. Careful planning is needed, as 'mistakes' or afterthoughts will show through.
2. Calls for considerable facility with the brush, as the work is often built up in successive and partly transparent brush sketches.
Painting on a Toned Ground
Steps:
1. Place an accurate drawing over the toned ground.
2. Shade shadows with thin raw umber washes, allowing the ground to show through. Paint dead color as pale thin turps washes of eventual colors. Washes, ground and shadows now form a three-tone scheme.
3. Dry. The old masters would have used lean colors, in essential oils, and allowed canvas to dry for months at this stage to ensure that no oil was left to dry later.
4. Remodel above with thicker, more opaque colors, still allowing ground to show through. The old masters understood that each pigment should have its medium adjusted to take account of individual properties.
5. Dry.
6. Repaint with more definition, still allowing ground to show through. The yellows need to be reduced as the painting will yellow slightly in time.
7. Dry.
8. Add glazes, thickening or wiping out as necessary.
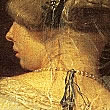
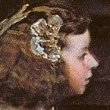
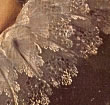
Rubens (see detail) painted with varnish, wet into wet over a less absorbent white, gray or pink ground. Lights were put in impasto with a stiff brush and afterwards very lightly blended.
Painting on a Dark Ground
The second of the classical techniques for oil painting, used by Rembrandt, Velazquez and others for strong chiaroscuro effects, employs a dark ground. The dark ground serves for shadows, other areas being built up as layers in varying degrees of opaqueness.
Steps:
 1.
Darken the ground.
1.
Darken the ground.
2. Ensure the ground is dry.
3. Trace an accurate drawing or sketch in the main outlines as required.
3. Dry.
4. Underpaint in grisaille, modeling tones with frotties and using glazes over the dark ground.
5. Dry.
6. Apply the upper layers of paint, usually in several sessions, keeping the tones on the light side to allow for later glazes.
7. Add highlights in white.
8. Dry.
9. Add colored (generally multiple) glazes.
Alla Prima
Alla prima resembles the above, but largely does away with final glazes. Paint is more thickly applied, but needs skill as final adjustments are not so easily made.
Steps:
 1.
Add a careful shaded brush sketch to a pale-toned
ground.
1.
Add a careful shaded brush sketch to a pale-toned
ground.
2. Add shadows in two levels of glaze. The work now has three tones.
3. Scumble in white highlights while the glazes are still wet.
4. Dry.
5. Add colors, as frotties or spread colored glazes which are then worked into with some white or body color. The ground still shows through.
6. Rework the last layer with more body color.
7. Add finishing touches of thin body color.
 Steps
Steps